Develop a desktop client with PyQT
In this novel,I’ll demonstrate how to read the database and display it , with Python’s dynamic mechanism and Qt’s signal slot.
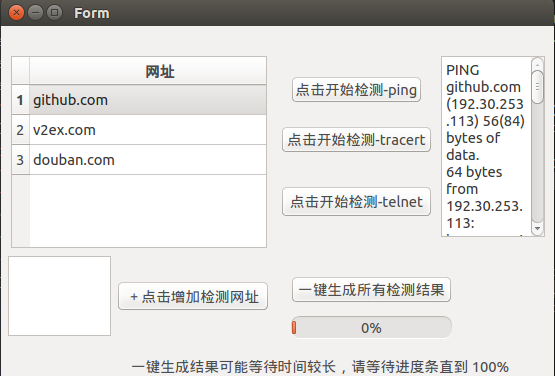
This is a program that can detect network connections. The screenshot of the interface is as follows
There will be very few opportunities to write the client in the future(I mean many professional clients are mainly developed by C#/.net,although actually dropbox developed its’ client with PyQT)… So I won’t pursue the best practices. I just need to make a poke-marked GUI .⊙﹏⊙b
UI and interface corresponding
PyQt itself is similar to Qt’s signal slot mechanism. When a button is clicked, a signal is sent and the processing mechanism of the signal needs to be defined.
The design interface is designed directly with the designer. Drag button/listview/model and customize the name.
After generating the .ui file, use pyuic4 –x ping_ui.ui –o ping_ui.py to see that the ping_ui.py file contains class Ui_Form(object), which has various lengths/locations defined. It’s More convenient than handwriting
Then define a pyqt_example2.py which contains the following files:
“starthighlight” class CalculateForm(QWidget): def init(self, parent=None): super(CalculateForm, self).init(parent)
    self.ui = Ui_Form()
    self.ui.setupUi(self)
“endhighlight”
then define the execution function:
“starthighlight” if name == ‘main': app = QApplication(sys.argv) calculator = CalculateForm() calculator.show() sys.exit(app.exec_())
“endhighlight”
After execution, you can see that the interface has been successfully displayed.
The next step is to establish a signal slot mechanism. For example, when the button of the ui was originally defined, there is a button named add_url . We want to associate it with the function of add_url , just define it as follows (preferably in init ):
“starthighlight” self.ui.add_url.clicked.connect(self.add_url_func) # click function “endhighlight”
CRUD and Display
The model defined in PyQt is QSqlTableModel, and the definition of table is listview.
For example, define the method of initialize_model() :
“starthighlight” db = QtSql.QSqlDatabase.addDatabase(‘QSQLITE’) db.setDatabaseName(‘test_ping.db’)
def initialize_model(model): model.setTable(‘url_ping’) model.setEditStrategy(QtSql.QSqlTableModel.OnManualSubmit) model.select() model.setHeaderData(0, QtCore.Qt.Horizontal, u"url”) # url link “endhighlight”
To display, just connect the listview with the corresponding model:
“starthighlight” def show_view(self): model = QSqlTableModel() initialize_model(model) self.ui.url_list.setModel(model) # self.ui.url_list is listview self.ui.url_list.show() “endhighlight”
You can see the latest database, equivalent to refreshing, by calling the self.show_view() method after each addition, deletion, and change.
How to execute a query
For example, to find the content containing ‘test’, the code is as follows:
“starthighlight” query = QtSql.QSqlQuery() query.exec_(“select * from test where value like ‘%test%'") “endhighlight”
And if you want to show with a better way,then redefine QSqlQueryModel
“starthighlight” sqlQueryModel.setQuery(“select * from test where value like ‘%test%’ “) self.ui.url_list.setModel(sqlQueryModel) self.ui.url_list.show() “endhighlight”
Define the popup: Use the simplest of the following functions:
“starthighlight” def show_messagebox(self): msg = QMessageBox() msg.setText(u’detect successfully’) msg.setStandardButtons(QMessageBox.Ok) msg.exec_() “endhighlight”
Ui and execution thread separation
How to set the ui and execute task thread separation so that the application won’t be non-reactive:
There are many ways to do this. I chose the following method:
“starthighlight” from PyQt4.QtCore import QThread
class PingThread(QThread): "”” define PingThread "”” def init(self, url): QThread.init(self) self._url = url
def run(self):
    ping_url(self._url)
    self.emit(SIGNAL('ping url'))
    return
"”” Then call it in the main thread. "””
self.pingThread = PingThread(target_url)
self.connect(self.pingThread, SIGNAL(‘ping url’), self.show_messagebox) 可选
self.pingThread.start()
“endhighlight”
ProgressBar
The progress bar in PyQt is displayed using QProgressBar. When set in ui, there will be a minimum value (default is 0) and a maximum value (default is 100).
Just set it when updating
“starthighlight” self.ui.click_progrress.setValue(30) # progresses to 30%
click_progress 是 ui 里对应的 ProgressBar
“endhighlight”
Other Stuffs
The ping calls the ping API that comes with the system.
Tracert calls the tracert API in windows (the corresponding Linux command is traceroute)
Telnet is to detect if the port is open. Directly calling the system command has two drawbacks:
1 Windows requires the user to manually open the configuration
2 telnet uses the cursor to flash to determine the port status with no return value, it is not convenient for program processing.
So final decision is to use socket to connect:
“starthighlight” sock = socket.socket(socket.AF_INET, socket.SOCK_STREAM) result = sock.connect_ex((url_name, 80)) port_open = True if result == 0 else False “endhighlight”
PyQt comes with a lot of demos in site-packages, and it’s faster to see the code directly than the documentation. At the time of the study, I wrote a calculator demo that adds genuine. When the input number or the selected calculation symbol changes, the calculation result is automatically changed (well, eval()~ and the Python decorator is used. characteristic.